Favorite Wilde Quotes

~I never travel without my diary. One should always have something sensational to read on the train.~

~Be yourself; everyone else is already taken.~

~I love talking about nothing. It is the only thing I know
anything about.~

~Oscar Wilde


Welcome!

Welcome!
~~~~~~~~~~~~~~~~~~~~~~~~~

``````````````````````````````````````````````

Thursday, September 22, 2011

Free Fall Recipe Cards

Do you write or type out your recipes?  Like to give them as gifts?  Set them out on a stand like Martha Stewart while you are creating your masterpiece?  You never know when someone will stop by in the middle of your preparation, and admire your kitchen recipe decor.

HP (Hewlett-Packard) is here to help you out.   Each project, uses their software backgrounds, your words and photos.  Adding a photo is not required.  Some projects high lighted are:  Fall Inspired Recipe Cards; Autumn Word Scramble (use view to enlarge and check it out); Family Newsletter (not really a Fall theme); and, Creative Studio for the Home to see ALL of their choices.  You can sort by Project Type, Project By Brand, Themes and Occasions and Tips, Learn & Share.

This is what MS does in her spare time... Martha Stewart Egg Cozies!

I tried out the Fall recipe card.  Really simple, since I already had this recipe in a word doc.  I just used cut-n-paste, easy-peasy.  And since I did not have a tempting aromatic cup of cocoa to enjoy a photo shoot with, I relied on Google and found a photo here.  Mine would have looked just as tempting -don't you think?

I think the Fall colors go perfectly with a steaming cup of Mexican Hot Cocoa... Yum!


Tell me about your creations, what did you come up with?  To see my other HP projects go HERE.

Linking up to:  Somewhat Simple, Crafty, Scrappy, Happy, Gluesticks, Fireflies & Jellybeans, While He Was Napping, Polly Want A Crafter, Tales From Bloggeritaville, Delightful Order, Finding Fabulous, Creation Corner, Fun To Craft, French Country Cottage, Stuff and Nonsense, Fingerprints on the Fridge


Enjoy!
~Shelly

Thursday, September 15, 2011

October Is On It's Way~ Let's make some cards!

Since I haven't done anything Fall-ish around the house... yet, I dug out the ole card making supplies and came up with a couple of  Halloween themed cards.


After I cut and scored the cardstock,  I punched out a circle for the moon in orange and colored it with a yellow chalk marker.  I placed the front of the card in the embossing folder, gently closing it and moving the moon around until I decided where I liked it best and lightly glued it to the front. Some beginners might not realize... what to do with that pesky back side of the card when you are embossing?  Just fold it around the back side of the folder, and slide it on through your machine. Really.  I used to be a beginner, I should know.

Inking up the raised/embossed tree, makes the moon look like it is behind it. Magic.  My original idea, I am sure of it.


I had intended to use my spider web embossing folder, like this one...
however, it has gone missing -jumped right out of my binder.  Hence the tree!


Some close ups of my first try~


You get extra points if you noticed the piece of lint on my owl.  How on earth did that get there?


Just a tiny peak of the inside too.  I should probably add a sentiment. 


Supplies used:
Stampin Up!:  Dark and Dreary cling stamp set (2010) and Crumb Cake cardstock
Sycamore embossing folder, Craft Concepts
Chalk Ink, Wet Wipe marker, yellow (color name not specified on marker)   
Ribbon from Michael's Crafts
Circle punch, 1.25 inch; Xyron -Create-a-Sticker; Crop-A-Dile corner rounder; Score Pal
Ink:  Memories Chalk Ink, Creamy Coffee
        Brilliance, Graphite Black
        Versafine, Vintage Sepia


And this is what I came up with on my second try:


Supplies used:
Stampin Up!: Howl-o-ween Creeps & Spooky Bingo Bits cling Stamp sets (2011); Crumb Cake cardstock
Sycamore embossing folder, Craft Concepts
Chalk Ink -Wet Wipe marker, yellow (color name not specified on marker)
Ribbon from Michael's Crafts
Circle punch, 1.5 inch; Xyron -Create-a-Sticker; Crop-A-Dile corner rounder; Scor-Pal
Ink:  Memories Chalk Ink, Creamy Coffee
        Brillance, Graphite Black
        Versafine, Vintage Sepia


If you would like one of these cards -just send me your address and I will pop it (mailing envelope included) in the mail to you -just let me know which one you would like.  I only made 2, so supplies are scary! (You know I mean scarce, right? :)

Thanks for stoppin' by!
~Shelly

Thursday, September 8, 2011

Last Summery Post


I admit it!!!  It is a bit late for this post....  I had a ton of pictures to choose from of the After, but kept forgetting to get the details taken care of.   Oh, well.  Some of you still have a ton of light to carry you deep into February.

We happen to have numerous steps leading up to our front door, without flower beds aka "dirt" to add solar lights.  These happen to be tiny bulbs, so they are more like "glow" lights, but they glow oh so beautifully!

Supplies needed:
-smallest size clay pot
-ORB (oil rubbed bronze) spray paint or, any color you choose
-drill
-masonry drill bit the same size, or slightly smaller, as the base or your solar lights
-solar lights purchased from the garden center of your favorite store

Your bit will look something like this one from Bosch


Now all you need to do is take out the stake that is tucked inside the solar light tube.


Turn the clay pot upside down, center the tube on the drainage hole and trace the end onto the pot.  Not all of my circles were centered, and were used more of as a guideline.  (I skipped this step and just guessed.)  Note:  The enlarged hole you are making for the stake should be smaller than your tracing mark.  The stake needs to fit snugly, or it will tilt.  I know, because I over-widened the hole on a couple of the pots!  Learn from my mistakes. :)
 Choose a drill bit that is just slightly smaller than your traced circle.  (My bit was a lot smaller, but still worked.  It just took me longer, as I had to move the bit up and down along the edges of the hole until the stake fit snugly.)


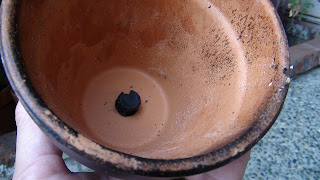
From the inside, your pot should look like this


And here is the finished product!


Again, here is what they look like during the day


And here is what they look like at night!

This was a fast, fun and easy project!  I bet some of you more brave at heart can come up with a rainbow of clay pot colors and it will look fabulous.  Be sure to share!

~Shelly
~Linking up to~


Wednesday, September 7, 2011

A Refreshing Partnership


Want to put a smile on your face?  Be inspired by elegance and indescribable talent?  Well, then you have come to the right place!  In this clip are the fabulous  Fred Astaire & Ginger Rodgers, staring in the 1936 RKO musical comedy -Swing Time. They are so light on their feet, the tippity tappity just makes you giddy!  Mr. Astaire is impeccably dressed down to the minutest detail.  Miss Rogers' dress is gorgeous as it flows with every movement, and when she lifts it up to show a flash of leg..... WOW!  They are perfection right up until the moment of their spectacular exit!   Pop on over and take a look, Swing Time.

 Enjoy~
~Shelly

Thursday, August 11, 2011

Estate Sales - Did you know....?


Hey!  I was just stopping by the Tiny Tudor, and Melanie recommended a fabulous site!  She gives tips regarding shopping etiquette and best times to arrive, here.  The site is Estate Sales (dot) net.  All you have to do is choose your state and zip code for a list of sales near you.  You can sign up for notices a few days before, and of course it is FREE!  I just found a local 3-day sale that started today, and they even linked to a video on YouTube of a walk-through!  The family is moving out of the country and seem to be selling everything.  I will not be going, but I sure had fun looking. :)  Our already-full-storage is safe for a few more days....
Happy Hunting!
~Shelly

Tuesday, August 9, 2011

I Do Tricks

Hey there!

How's it going?  This is me helping my mom plant the veggie garden.  I am showing her where the sun is.  She can feel my warm coat and know that the soil will be warm for her plants.  My coat is good that way.


When we are taking a break from our serious fun, I do tricks.  I am really good at this.  Check me out!
I am a potato!  Duh! 
~until next time, 
Staxie

Thursday, August 4, 2011

UPDATE: Mini Greenhouse Progress

Surprise, surprise, it worked!  We all knew it would, right? Look at these happy pumpkins!
What am I talking about?  Check out here for the original post.  So, 15 days later, this is what is going on...
Yep, that tall one in the back is a "pie" pumpkin  -yum!  They have grown so much in the last few days that I had to prop the lids open with a chopstick.

I started this with the notion that you plant more than you want, because some do not take, right?  Usually due to Gardener-error, as in, maybe wetting the seeds and letting them dry out?  It happens.  However, I consider this a huge success!  What does that really mean??? Ahem, glad you asked.

It means that I now have 9 pumpkin vines!!  My garden has 3 prolific lavender bushes next to all of the veggies and the bees are being ever so helpful...  Each vine will yield at least 1 pumpkin, and they need room to grow!  I am considering cutting out some of the lawn -it is all yellow anyway.  Not really.  Maybe I could let the vines grow across the lawn and we could just mow around them.  Why couldn't the carrots grow?  They are nice tight little packages!!  I think the seeds were old.  Definitely tossing them in the compost.  I'm gonna
try again...

On second thought, I guess I could wait for the plants to flower before I start counting my pumpkins... nah!
Cutie pie zucchini waiting to be planted into the fabulous earth.

 The white pumpkins have just come out in the last few days.  The onions are taking a bit longer too.  If you squint, you can see them next to the pumpkins.


Seed Statistics:
Spooktackular Pumpkin; planted 2, sprouted 2
Cinderella Pumpkin; planted 3, sprouted 2
White Pumpkin; planted 2, sprouted 2
Pie Pumpkin; planted 3, sprouted 3
Zucchini; planted 4, sprouted 3
Green Onions; planted 4, sprouted 4
Carrots; planted 4, sprouted -big fat 0
**3 Ready-for-seeds-wells; planted 0, sprouted 0

**Maybe that's why it only took me 15 minutes!  I wrote the type of seed planted on the lid of each container -and somehow missed 3.  I didn't notice until about a week ago that nothing was written on those 3 lonely domes.  I do not have enough room in my garden anyway!  It was meant to be!

LinkWithin

Related Posts Plugin for WordPress, Blogger...