I admit it!!! It is a bit late for this post.... I had a ton of pictures to choose from of the After, but kept forgetting to get the details taken care of. Oh, well. Some of you still have a ton of light to carry you deep into February.
We happen to have numerous steps leading up to our front door, without flower beds aka "dirt" to add solar lights. These happen to be tiny bulbs, so they are more like "glow" lights, but they glow oh so beautifully!
Supplies needed:
-smallest size clay pot
-ORB (oil rubbed bronze) spray paint or, any color you choose
-drill
-masonry drill bit the same size, or slightly smaller, as the base or your solar lights
-solar lights purchased from the garden center of your favorite store
Your bit will look something like this one from Bosch
Now all you need to do is take out the stake that is tucked inside the solar light tube.
Turn the clay pot upside down, center the tube on the drainage hole and trace the end onto the pot. Not all of my circles were centered, and were used more of as a guideline. (I skipped this step and just guessed.) Note: The enlarged hole you are making for the stake should be smaller than your tracing mark. The stake needs to fit snugly, or it will tilt. I know, because I over-widened the hole on a couple of the pots! Learn from my mistakes. :)
Choose a drill bit that is just slightly smaller than your traced circle. (My bit was a lot smaller, but still worked. It just took me longer, as I had to move the bit up and down along the edges of the hole until the stake fit snugly.)
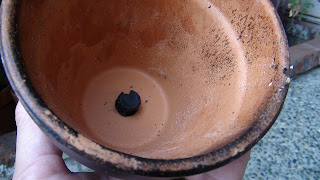
From the inside, your pot should look like this
And here is the finished product!
Again, here is what they look like during the day
And here is what they look like at night!
This was a fast, fun and easy project! I bet some of you more brave at heart can come up with a rainbow of clay pot colors and it will look fabulous. Be sure to share!
~Shelly
~Linking up to~
Someday Crafts
Kreations By Kara
Twin Dragonfly Designs
Katie's Nesting Spot
Somewhat Simple
SevenThirtyThree
French Country Cottage
Polly Want a Crafter
House of Hepworths
The Shabby Creek Cottage
All Thingz Related
Kreations By Kara
Twin Dragonfly Designs
Katie's Nesting Spot
Somewhat Simple
SevenThirtyThree
French Country Cottage
Polly Want a Crafter
House of Hepworths
The Shabby Creek Cottage
All Thingz Related


I love the lanterns, what a fabulous idea, I love it!! OK!, I'll get back to what I came to visit you for and it's...ROSIE!!, SO GLAD I DON'T LIVE CLOSE TO YOU CAUSE I'LL STILL HER IN A MINUTE! I adore pugs, I lost my Benny last year, he was gorgeous, smart, fun, lovable and sweet! I still miss him sooo much! Thanks for sharing, keep posting your Rosie! Hugs, FABBY
ReplyDeleteHi, what a great idea, they look so lovely up the steps at night.
ReplyDeleteSuzy xxx
What a great idea! Thanks for sharing! liz
ReplyDelete@orchidlanedecor.com Thank you! We love coming home to them. :)
ReplyDelete